You know the feeling - you’ve spent two hours mixing beautiful colors, pouring with hope, only to wake up to a mess that is still sticky and cloudy. Or a beautiful tray with a huge crack right through the middle.
The truth is, resin doesn’t just react to what you do — it reacts to where you do it. Temperature quietly runs the whole show.

Too cold? Resin sulks. Too hot? It throws a tantrum. Get it just right? You’re in for a glossy, bubble-free masterpiece.
Today, we’re breaking down how temperature affects resin curing, why it matters more than you think, and how to keep your projects out of the heartbreak zone.
The Temperature–Resin Relationship (AKA: Why It Acts Up)
Resin curing isn’t magic (even though it looks like it sometimes).
Really, it’s science - a chemical reaction between resin and hardener generates heat, allowing the transformation of liquid to a solid work of art.
The issue is that it is a super sensitive process.
The wrong temperature, soft spots, trapped bubbles, weird textures or even cracks can result.
The Goldilocks Zone: Perfect Resin Temperature
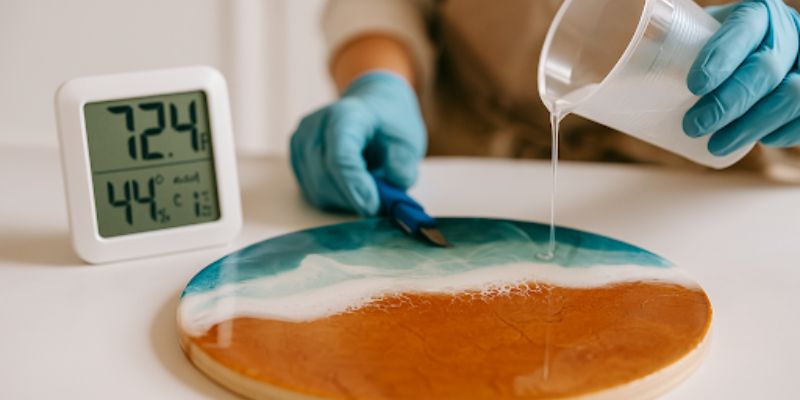
If you want your resin to behave, your workspace should be between 70°F and 75°F (that’s 21°C to 24°C for the Celsius squad).
-
Warm enough for resin to flow nicely
-
Cool enough to prevent runaway reactions
Stray outside this happy little zone, and things get unpredictable real quick.
Too Chilly? Here's What Happens!
-
Sloth Mode: The resin takes a really long time to cure, or stays sticky for days.
-
Fog Dreams: Moisture in the air condenses on your piece = a cloudy, hazy finish!
-
Bump Trouble: Cold, thick resin holds air bubbles captive—it can take a while for it to rise!
How to Fix Cold Resin Drama:
-
Warm your bottles in a cozy water bath (keep the caps on tight!).
-
Use a space heater to gently nudge your room into the right range.
-
Pick a low-viscosity resin if you know it’s freezing where you live.
Too Hot? Buckle Up
-
Zoom Zoom: Your resin will cure faster than you can blend your colors.
-
Cracks and Splits: Resin overheats and tears itself apart while curing.
-
Wobbly Surfaces: Heat can cause ripples, warps, or uneven finishes.
How to Handle Hot Weather Resin:
-
Work early morning or after sunset if it’s peak summer.
-
Pour smaller batches to prevent overheating mid-pour.
-
Keep a gentle fan running—but no blasting AC directly on it!
Cheat Sheet: Quick Fixes Based on Resin Mood Swings
|
Problem |
Cause |
Quick Save |
|
Sticky or soft surface |
Too cold or poor mixing |
Warm the room, remix carefully |
|
Cracked artwork |
Too much heat during curing |
Smaller pours, cooler workspace |
|
Cloudy finish |
Moisture from cold temps |
Control humidity, pre-warm the resin |
|
Tons of bubbles |
Thick, cold resin |
Warm resin, pour slower, torch it |
Extra Tips for Flawless Resin Vibes
-
Humidity Matters Too: Perfect is around 50%. Too humid? You run the risk of cloudiness. Too dry? Static dust storms.
-
Patience Pays: The more you rush to demold early = more disappointment. Give it the entire cure time it deserves.
-
Thermometer = BFF: Keep a small thermometer on your worktable. Rely on certainty rather than " gut feeling".
Wrap-Up: Resin Isn't Moody, It's Just Temperature Sensitive
Resin isn't trying to stress you out—it’s just very... particular.
If you respect the chemistry and set the mood right (temperature, humidity, patience), your pieces will shine, cure strongly, and stay beautiful for years.
So next time you gear up for a pour, check the vibes:
Is your space warm, cozy, and level? Cool. Resin will reward you.
And if you need resin kits, heat tools, or gear that’s already pro-approved, you know where to look: Tulsi Resin. We’re here to help you pour happy and stress-free.
Craft Smarter, Not Harder: Game-Changing Resin Art Tools That Save Time and Effort
Resin Coating vs Casting: How to Master Both and When to Use Each One